DBMS Degree Lab Records
PRACTICAL-I
ER-DIAGRAM FOR TRAIN SERVICES
DRAW ER-DIAGRAM FOR TRAIN SERVICES IN A RAILWAY STATION
An
Entity can be any object, place, person or class. Entity is represented using
rectangles. An “Entity–Relationship Model’’
(ER- model) modelling was developed for
database design by “Peter
Chen” and published in a “1976”. An ER- model describes about the
inter-related things of interest in a specific domain of knowledge. An ER model
is composed of entity types and specifies relationships that can exist between
instances of those entity types.
RAILWAY
MANAGEMENT SYSTEM:-
- ·
Railway management System is the computerized
system of reserving the seats of train seats in advanced .
- ·
On-line reservation
has made the process for the reservation of seats very much easier than ever before.
- · Almost all of the manual reservations centres have been converted into computerized reservation centres.
- ·
It provide booking and reservation of the ticket facilities from one station to another.
- ·
This system is very
helpful and it is very easy to operate on it. It allows advanced booking.
- ·
Computerization
system has also made it possible for passengers to book their tickets online
and it has also allowed for the checking
whether the tickets in waiting list are confirmed or not.
- · It also provides the information regarding fares and timings of the train.

*ER-DIAGRAM FOR HOSPITAL
ADMINISTRATION*
*DRAW
ER-DIAGRAM FOR HOSPITAL ADMINISTRATION*
Entity relationship diagram is used in modern database software engineering to illustrate logical structure of database. It is a relational schema database modelling method used to model a system and approach. This approach commonly used in database design. The diagram created using this method is called E-R diagram.

Patient
Table:
|
Fields |
Data Type |
Relationships |
|
PID |
Varchar(5) |
Primary Key |
|
name |
Varchar(20) |
Not Null |
|
sex |
Int |
Not Null |
|
address |
Varchar(50) |
Not Null |
|
pdetails |
Varchar2(20) |
Not Null |
|
date admitted |
Int |
Not Null |
|
date discharged |
Int |
Not Null |
Room Table:
|
Fields |
Data Type |
Relationships |
|
room id |
Varchar(50) |
Primary Key |
|
room type |
Varchar(10) |
Not Null |
|
period |
Varchar(10) |
Not Null |
Medicine
Table:
|
Fields |
Data Type |
Relationships |
|
price |
Varchar(50) |
Primary Key |
|
quality |
Varchar(10) |
Not Null |
|
code |
Varchar(10) |
Not Null |
Employee
Table:
|
Fields |
Data Type |
Relationships |
|
EID |
Varchar(50) |
Primary Key |
|
salary |
Varchar(10) |
Not Null |
|
E_address |
Varchar(10) |
Not Null |
|
sex |
Char(15) |
Not Null |
|
E_name |
Varchar2(30) |
Not Null |
|
history |
Varchar2(20) |
Not Null |
|
contact no. |
Int |
Not Null |
Record Table:
|
Fields |
Data Type |
Relationships |
|
record no |
Varchar(50) |
Primary Key |
|
appointment |
Varchar(10) |
Not Null |
|
patient id |
Varchar(10) |
Not Null |
|
description |
Char(15) |
Not Null |

PRACTICAL-III
* EXTRACT DETAILS FROM TABLES *
*WRITE A VIEW TO EXTRACT DETAILS FROM TWO OR
MORE TABLES*
The related tables of a large database are
linked through the use of foreign and primary key. The reference of primary key
is a foreign key. The extract details from
tables can be used by both of the keys i..e, primary and foreign keys. A
join is used for combining of two
tables. The ability to join tables will enable the user to add more meaning to the result table that
is produced. For 'n' number tables to be joined in a query, minimum (n-1) join
conditions are necessary. Based on the join conditions, Oracle combines the
matching pair of rows and displays the one which satisfies the join condition.
Joins are classified as below:
·
Natural join (also known as an equijoin or a simple join) -
Creates a join by using a commonly named and defined column.
·
Non-equality join - Joins tables when there are no equivalent rows
in the tables to be joined-for example, to match values in one column of a
table with a range of values in another table.
·
Self-join - Joins a table to itself.
·
Outer join - Includes records of a table in output when there's no
matching record in the other table.
·
Cartesian join (also known as a Cartesian product or cross join) -
Replicates each row from the first table with every row from the second table. Creates
a join between tables by displaying every possible record combination.
a)Natural Join: The NATURAL keyword can simplify
the syntax of an equijoin. A NATURAL JOIN is possible whenever two or more tables
have columns with the same name, and the columns are join compatible.
Example: Consider the
one-to-many relationship between the DEPARTMENTS and EMPLOYEES tables. Each
table has a column named DEPARTMENT_ID.This column is the primary key of the
DEPARTMENTS table and a foreign key of the EMPLOYEES table.
SELECT E.first_name, NAME,D.department_name DNAME FROM employees
E NATURAL JOIN departments D;
OUTPUT:- FIRST_NAME DNAME---------- ------
MILLER DEPT 1
JOHN DEPT 1
MARTIN DEPT 2
EDWIN DEPT 2
b)Self Join: A SELF-JOIN operation produces a result table when the relationship of
interest exists among rows that are stored within a single table. In other
words, when a table is joined to itself, the join is known as Self Join.
Example:
Consider EMPLOYEES table, which contains employee and their
reporting managers. To find manager's name for an employee would require a join
on the EMP table itself. This is a typical candidate for Self Join.
SELECT e1.FirstName Manager,e2.FirstName Employee
FROM employees e1 JOIN employees e2 ON (e1.employee_id = e2.manager_id)
ORDER BY e2.manager_id DESC;
c)Non Equijoins: A non-equality join is used when
the related columns can't be joined with an equal sign-meaning there are no
equivalent rows in the tables to be joined. A non-equality join enables you to
store a range's minimum value in one column of a record and the maximum value
in another column. If the join does find a matching range for the item, the
corresponding shipping fee can be returned in the results.
Example: SELECT E.first_name, J.job_hisal, J.job_losal, E.salary FROM employees
E JOIN job_sal ON (E.salary BETWEEN J.job_losal AND J.job_losal);
d)Outer Joins: An Outer Join is used to identify
situations where rows in one table do not match rows in a second table, even
though the two tables are related. There are three types of outer joins:
i) INNER JOIN
ii) LEFT OUTER
JOIN
iii) RIGHT OUTER
JOIN
i)INNER JOIN: They all begin with an INNER
JOIN, and then they add back some of
the rows that have been dropped.
ii)
LEFT OUTER JOIN: A LEFT OUTER JOIN adds back all
the rows that are dropped from the first
(left) table in the join condition, and output columns from the second (right)
table are set to NULL. The query demonstrated above can be used to demonstrate
left outer join, by exchanging the position of (+) sign.
Example: SELECT E.first_name, E.salary, D.department_id FROM employees E,
departments D WHERE D.DEPARTMENT_ID = E.DEPARTMENT_ID (+);
OUTPUT:- FIRST_NAME SALARY DEPARTMENT_ID JOHN 6000 10
EDWIN 2000 20
MILLER 2500 10
MARTIN 4000 20
iii)RIGHT OUTER JOIN: A RIGHT OUTER JOIN adds back all
the rows that are dropped from the second (right) table in the join condition,
and output columns from the first (left) table are set to NULL.
Example: SELECT E.first_name, E.salary, D.department_id FROM employees E,
departments D WHERE E.DEPARTMENT_ID (+) = D.DEPARTMENT_ID;
OUTPUT:- FIRST_NAME SALARY DEPARTMENT_IDJOHN 6000 10
EDWIN 2000 20
MILLER 2500 10
MARTIN 4000 20
------------------------------------------------------------------- * SQL
COMMANDS *
Query
is nothing but a command. The interactive SQL commands classified into
·
DDL
(Data Description/Definition Language)
Commands
·
DML
(Data Manipulation Language)Commands
DDL Commands:
1. Create table
Syntax: -
Create table table_name (field1 datatype(size), field2
datatype(size)… field n datatype(size));
Description: - This command is used to create a table with various
fields.
2. Create Table ………As Select … …
Syntax: -
Create table table_name2 (field1,
field2, …………) As Select
field1,field2,……from table_name1;
Description: - This type of create command is used to create
the structure of new relation from the
structure of old relation.
3.
Alter Table …… Add: -
Syntax: -
Alter table table_name Add (new field1 datatype(size),
new field2 data type(size)…);
Description: - This command issued to change the width as
well as data type of fields of existing relations.
4. Alter table……Modify
Syntax: -
Alter table table_name Modify(field1 new datatype(size), field2 new
datatype(size),……);
Description:- This command is used to change the width as
well as data type of fields existing relations.
5. Drop table
Syntax: -
Drop table table_name
Description: - This command is used to destroy the existing
tables.
DML Commands:
1. Insert into
Syntax: -
Insert into table_name(field1,
field2, ……,field n) values (data-1, data-2, ……… data-n);
Description: - This command is used to add necessary
records to existing tables.
2. Update-set-Where
Syntax: -
update relation_name set field-name=data, field-name=data where(fieldname=data)
Description: - This command is used to change the contents
of records in existing tables.
3. Delete From
Syntax: -
delete field1, field2,………, fieldn
from relation-name;
Description: - This command is used to delete required
fields from the table.
4. Select-From
Syntax: - SELECT * from relation name;
Description: - This command used to display all the fields
from existing relations.
5. Select – from - Where:
Syntax: -
Select set of fields from relation-name WHERE (condition);
Description: - This command is used to display all the
fields details from the relation but depends on some condition.
6. Select-from-Group By
Syntax: -
Select set of fields from relation –name Group BY field-name;
Description: - This command is used to group all the records
in a relation.
7. Select-from-Order By
Syntax: -
select set of fields from relation name order by field-name;
Description: - This command is used to display all the
records from a relation either ascending order, descending order or
alphabetical order.
8. Union
Syntax: -
select field1, field2,……… from tablename1 where (condition)
UNION
Select field1, field2,………from tablename2 where
(condition)
Description: - This command is used to display the combined
rows of the different quarries which are having the same structure with out
duplicate rows.
9. Intersect
Syntax: -
select field1,field2,…………from tablename1 where(condition)
INTERSECT
Select field1, field2,……… from tablename2 where
(condition)
Description: - This command is used to get common rows of
two different Quarries which are having the same structure.
10. Minus
Syntax: -
Select set of fields from relation name1
MINUS
Select set of fields from relation name2
Description: - This command is used to find the common
fields which are belonging to relation1 those fields are not in relation2.
11. DESC Table name
Syntax: -
desc table_name;
Description: - This command displays the structure of
existing table.
12 Select * from tab
Syntax: -
Select * from tab;
Description: - This command displays all previous tables
which are stored in our database.
*SQL
COMMAND EXAMPLES*
Create
a department table and employee table with the following details. Employee
table and Department table are related with DEPTNO as reference key.
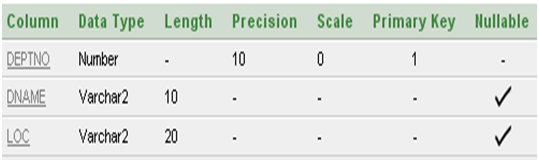
Department Table:
|
Column Name |
Is null |
Type |
Relation |
|
DeptNo |
No |
Number(10) |
Primary
key |
|
Dname |
No |
Varchar2(10) |
|
|
Loc |
Yes |
Varchar2(20) |
|
Employee Table:
|
Column Name |
Is null |
Type |
Relation |
|
EmpNo |
No |
Number(10) |
Primary
key |
|
Ename |
No |
Varchar2(10) |
|
|
Job |
Yes |
Varchar2(15) |
|
|
Salary |
Yes |
Number(10) |
|
|
DeptNo |
No |
Number(10) |
Foreign
Key |
1.
create table department (deptno
number(10) PRIMARY KEY, dname varchar2(10) NULL, loc
varchar2(20) NULL);
Output: Table created. 2. DESC DEPARTMENT; Output: 
3. insert into department values ('1','Maths','First Floor'); Output: 1 row(s) inserted. insert into department values ('2','Computers','Second Floor'); Output: 1 row(s) inserted. insert into department values ('3','English','Third Floor'); Output:1 row(s) inserted. insert into department values ('4','IHC','First Wing'); Output:1 row(s) inserted. insert into department values ('5','Stastics','Second Wing'); Output: 1 row(s) inserted. 4. SELECT * FROM DEPARTMENT; Output: 

2. create table employee
(empno number(10) PRIMARY KEY, ename varchar2(10) NOT NULL, job varchar2(15) NULL, salary number(10) NULL, deptno number(10) REFERENCES department); Output: Table created. 4. alter table employee ADD (MGR varchar2(20)); Output: Table altered. 5. DESC EMPLOYEE; Output: 

6. insert into employee values ('1','Rajesh','Teaching',15000, 2,'M.K'); Output: 1 row(s) inserted. insert into employee values('2','Murthy','Teaching',16000,1,'R.K'); Output:1 row(s) inserted. insert into employee values('3','Venkat','Teaching',10000,3,'K.K'); Output:1 row(s) inserted. insert into employee values('4','Suresh','NonTeaching',7000,4,'KRISH'); Output: 1 row(s) inserted. insert into employee values('5','Naresh',' NonTeaching',6000, 1,'R.K.M'); Output:1 row(s) inserted. insert into employee values('6','Harsha','Teaching',12000,3,'K.K'); Output:1 row(s) inserted. insert into employee values('7','Sailu','Teaching',13000,1,'R.K'); Output: 1 row(s) inserted. insert into employee values('8','Krishna','NonTeaching',9000,2,'R.K'); Output: 1 row(s) inserted. insert into employee values('9','Sweety','Teaching',15000,2,'KRISH'); Output: 1 row(s) inserted. insert into employee values('10','Meghana','NonTeaching',2000,3,'K.K'); Output:1 row(s) inserted. 7. SELECT * FROM EMPLOYEE; Output:
8. SELECT e.ename, d.dname, e.salary FROM employee e, department d WHERE e.deptno=d.deptno ORDER BY d.dname; Output:
8.
select max(e.salary) as "Max Salary", d.dname from employee e, department d where e.deptno=d.deptno group by d.dname
Output:

9.
SELECT SUM(e.salary) as "Sum of
Salary", d.dname FROM employee e, department d WHERE e.deptno = d.deptno
GROUP BY d.dname
Output:

10. UPDATE employee SET deptno = 5 WHERE empno= 5;Output: 1 row(s) updated. 11.
create table employee_tmp(empno,
ename, job, salary, deptno) as select
empno, ename, job, salary, deptno from
employee;
Output: Table created. 12.
insert into employee_tmp values(1,'Bhanu',’Clerk’,5000,5);
Output : output:1 row(s) inserted.
INSERT INTO employee_tmp VALUES(2,'Nano','Sr.
Clerk',8000,4);
Output : output:1 row(s) inserted. INSERT INTO employee_tmp
VALUES(3,'Bambino','Accountant',6000,3);
Output : output:1 row(s) inserted. INSERT INTO employee_tmp
VALUES(4,'Mittal','Manager',26000,1);
Output : output:1 row(s) inserted.
INSERT INTO employee_tmp
VALUES(5,'Obama','CEO',54000,2);
Output : output:1 row(s) inserted.
13.
select
empno,ename,job,salary,deptno from employee
union
select
empno,ename,job,salary,dept_no from employee_tmp order by deptno
Output:

14.
select
empno,ename,job,salary,deptno from employee
inTERSECT
select empno,ename,job,salary,dept_no from employee_tmp order by deptno

15.
drop table employee_tmp ;
Out put : Table dropped. ------------------------------------------------------------------------------------------------------------------- PRACTICAL-V
* PL/SQL PROGRAM FOR FUNCTIONS *
*WRITE A PROGRAM TO DEMONSTRATE A FUNCTION*
Creating a Function
A
standalone function is created using the CREATE FUNCTION statement.
The simplified syntax for the CREATE OR REPLACE PROCEDURE statement
is as follows −
CREATE [OR REPLACE] FUNCTION function_name
[(parameter_name [IN | OUT | IN OUT] type [, ...])]
RETURN return_datatype
{IS | AS}
BEGIN
< function_body >
END [function_name];
Where,
·
function-name specifies the name of the function.
·
[OR
REPLACE] option allows the modification of an existing function.
·
The
optional parameter list contains name, mode and types of the parameters. IN
represents the value that will be passed from outside and OUT represents the
parameter that will be used to return a value outside of the procedure.
·
The
function must contain a return statement.
·
The RETURN clause
specifies the data type you are going to return from the function.
·
function-body contains the executable part.
·
The AS
keyword is used instead of the IS keyword for creating a standalone function.
Example:
The following example demonstrates Declaring,
Defining, and Invoking a Simple PL/SQL Function that computes and returns the
maximum of two values.
DECLARE a number;
b number;
c number;
FUNCTION findMax(x IN number, y IN number)
RETURN number IS z number;
BEGIN
IF x > y THEN
z:= x;
ELSE Z:= y;
END IF;
RETURN z;
END;
BEGIN
a:= 23;
b:= 45;
c := findMax(a, b);
dbms_output.put_line(' Maximum of (23,45): ' || c);
END;
/
When the above code is executed at the SQL prompt, it
produces the following result –
OUTPUT:
Maximum of (23,45): 45 PL/SQL procedure successfully completed. ---------------------------------------------------------------- PRACTICAL-VI
* PL/SQL PROGRAM FOR TRIGGERS *
*WRITE A PROGRAM TO DEMONSTRATE A DATABASE
TRIGGERS*
|
·
A
trigger is a pl/sql block structure which is fired when a DML statements like
Insert, Delete, Update is executed on a database table. ·
A
trigger is triggered automatically when an associated DML statement is
executed. Syntax for Creating a Trigger:
CREATE [OR REPLACE ] TRIGGER trigger _name {BEFORE | AFTER | INSTEAD OF } {INSERT [OR] | UPDATE [OR] | DELETE} [OF col_name] ON table_name [REFERENCING OLD AS o NEW AS n] [FOR EACH ROW] WHEN (condition) BEGIN --- sql statements END; |
- CREATE
[OR REPLACE ] TRIGGER trigger_name - This clause creates a trigger with the given name or
overwrites an existing trigger with the same name.
- {BEFORE
| AFTER | INSTEAD OF } - This clause
indicates at what time should the trigger get fired. i.e for example:
before (or) after updating a table. INSTEAD OF is used to create a trigger
on a view. before and after cannot be used to create a trigger on a view.
- {INSERT
[OR] | UPDATE [OR] | DELETE} - This
clause determines the triggering event. More than one triggering events
can be used together separated by OR keyword. The trigger gets fired at
all the specified triggering event.
- [OF
col_name] - This clause is used with update triggers. This clause is
used when you want to trigger an event only when a specific column is
updated.
- CREATE
[OR REPLACE ] TRIGGER trigger_name - This clause creates a trigger with the given name or
overwrites an existing trigger with the same name.
- [ON
table_name] - This clause identifies the name of the table or view to
which the trigger is associated.
- [REFERENCING
OLD AS o NEW AS n] - This clause is used to reference the old and new values of
the data being changed. By default, you reference the values as :old.column_name
or :new.column_name. The reference names can also be changed from old (or
new) to any other user-defined name. You cannot reference old values when
inserting a record, or new values when deleting a record, because they do
not exist.
- [FOR
EACH ROW] - This clause is used to determine whether a trigger must
fire when each row gets affected ( i.e. a Row Level Trigger) or just once
when the entire sql statement is executed(i.e, statement level Trigger).
- WHEN
(condition) - This clause is valid only for row level triggers. The
trigger is fired only for rows that satisfy the condition specified.
For
Example:
The price of a product changes constantly. It is
important to maintain the history of the prices of the products. We can create a trigger to update the
'product_price_history' table when the price of the product is updated in the
'product' table.
1) Create
the 'product' table and 'product_price_history' table
CREATE TABLE product_price_history (product_id number(5), product_name varchar2(32), supplier_name varchar2(32), unit_price number(7,2) ); CREATE TABLE product (product_id number(5), product_name varchar2(32), supplier_name varchar2(32), unit_price number(7,2) );
2) Create
the price_history_trigger and execute it.
CREATE or REPLACE TRIGGER price_history_trigger BEFORE UPDATE OF unit_price ON product FOR EACH ROW BEGIN INSERT INTO product_price_history VALUES (:old.product_id, :old.product_name, :old.supplier_name, :old.unit_price); END; /
3) Lets
update the price of a product.
UPDATE PRODUCT SET unit_price = 800 WHERE product_id = 100
Once the above update query is
executed, the trigger fires and updates the 'product_price_history' table.
4)If
you ROLLBACK the transaction before committing to the
database, the data inserted to the table is also rolled back.
Types of PL/SQL Triggers:
There are two types of triggers
based on the which level it is triggered.
1)
Row level trigger - An event is triggered for each row
upated, inserted or deleted.
2)
Statement level trigger - An event is triggered for each
sql statement executed.
PL/SQL Trigger Execution Hierarchy:
§ BEFORE statement trigger fires first
§ Next BEFORE row level trigger fires, once for each row affected.
§ Then AFTER
row level trigger fires once for each affected row. This events will
alternates between BEFORE and AFTER row level triggers
§ Finally the AFTER statement level trigger fires.
For
Example:
Let's create a table 'product_check'
which we can use to store messages when triggers are fired.
CREATE TABLE product(Message varchar2(50), Current_Date number(32));
Let's create a BEFORE and AFTER
statement and row level triggers for the product table.
1)
BEFORE UPDATE, Statement Level: This
trigger will insert a record into the table 'product_check' before a sql update
statement is executed, at the statement level.
CREATE or REPLACE TRIGGER Before_Update_Stat_product BEFORE UPDATE ON product Begin INSERT INTO product_check Values('Before update, statement level',sysdate); END; /
2)
BEFORE UPDATE, Row Level: This
trigger will insert a record into the table 'product_check' before each row is
updated.
CREATE or REPLACE TRIGGER Before_Upddate_Row_product BEFORE UPDATE ON product FOR EACH ROW BEGIN INSERT INTO product_check Values('Before update row level',sysdate); END; / 3)
AFTER UPDATE, Statement Level: This
trigger will insert a record into the table 'product_check' after a sql update
statement is executed, at the statement level.
CREATE or REPLACE TRIGGER After_Update_Stat_product AFTER UPDATE ON product BEGIN INSERT INTO product_check Values('After update, statement level', sysdate); End; /
4)
AFTER UPDATE, Row Level: This
trigger will insert a record into the table 'product_check' after each row is
updated.
CREATE or REPLACE TRIGGER After_Update_Row_product AFTER insert On product FOR EACH ROW BEGIN INSERT INTO product_check Values('After update, Row level',sysdate); END; / Now lets execute a update statement on table product. UPDATE PRODUCT SET unit_price = 800
WHERE product_id in (100,101);
Lets check the data
in 'product_check' table to see the order in which the trigger is fired.
SELECT * FROM product_check;
Output:
Mesage
Current_Date
------------------------------------------------------------
Before update, statement level
26-Oct-2024
Before update, row level
26-Oct-2024
After update, Row level
26-Oct-2024
Before update, row level
26-Oct-2024
After update, Row level
26-Oct-2024
After update, statement level 26-Oct-2024
§
The above result shows 'before update' and 'after update' row level
events have occurred twice.
§
since two records were updated.
§
But 'before update' and 'after
update' statement level events are fired only once per SQL statement.
-------------------------------------------------------------- PRACTICAL-VII
* CREATING REPORTS USING QUERIES *
*CREATION OF REPORTS BASED ON DIFFERENT
QUERIES*
§ You can run SQL queries directly against the
reporting data model and then output the results in a comma-separated value
(CSV) format.
§ This gives you the flexibility to access and
share asset and vulnerability data that is specific to the needs of your security
team.
§ Leveraging the capabilities of CSV format, you
can create pivot tables, charts, and graphs to manipulate the query output for
effective presentation.
§ To use the SQL Query Export feature, you will
need a working knowledge of SQL, including writing queries and understanding
data types.
Defining
a query and running a report:
§ Click the Create tab
at the top of the page and then select Site from the drop-down list.
§ On the Create a report page,
select the Export option and then select the -SQL Query
Export_ template from the carousel. The Security Console displays a box for
defining a query and a drop-down list for selecting a data model version.
§ If you want to focus the query on specific
assets, click the control to Select Sites, Assets, or Asset Groups, and make
your selections. If you do not select specific assets, the query results will
be based on all assets in your scan history.

§ If you want to limit the query results with
vulnerability filters, click the control to Filter report
scope based on vulnerabilities, and make your selections.
§ Click the text box for defining the query.
The Security Console displays a page for defining a query, with a text box that
you can edit.
§ In this text box, enter the query. Tip: Click
the Help icon
to view a list of sample queries. You can select any listed query to use it for
the report.

·
Click the Validate button to view and correct any
errors with your query.
The
validation process completes quickly.

· Click the Preview button to verify that the query output reflects what you want to include in the report. The time required to run a preview depends on the amount of data and the complexity of the query.

If necessary, edit the query based on the validation or preview results. Otherwise, click the Done button to save the query and run a report.
If you click Cancel,
you will not save the query.
The Security Console displays
the Create
a report page with the query displayed for reference.

§ Click Save & run the report or Save the
report, depending on what you want to do.
§ For example, if you have a saved report and
want to run it one time with an additional site in it, you could add the site,
save and run, return it to the original configuration, and then just save.


Comments
Post a Comment